How a Viral Makeup Tutorial Made My Passport Photo Flawless
:upscale()/2025/02/26/111/n/44344577/tmp_OZuwpM_098b5eb6b4e8b7fc_tmp_frBJ1W_35ea1094bfc175b1_84D2A5DC-9470-4FC9-B9E1-259024329B54.webp)
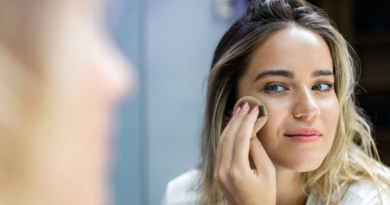
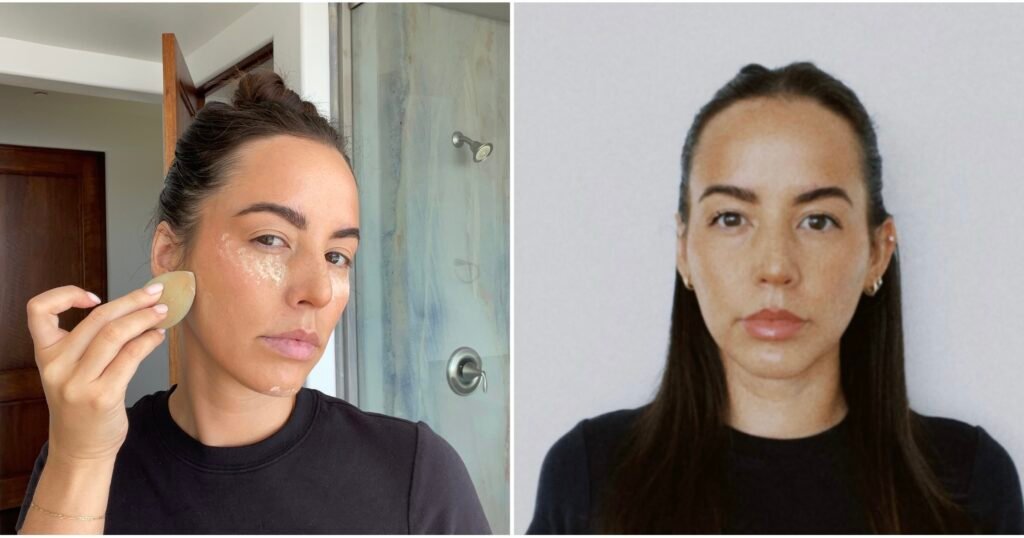
The last time I got a passport photo, I was 22 and about to head to Costa Rica to teach English after finishing college. I wore a plaid button-up shirt, a rather unattractive red scarf, and completely skipped makeup. Amazingly, I still managed to look presentable. Nearly a decade later, it’s time to update my passport photo. I’ve come to terms with the fact that I can’t look my best in a picture without at least a bit of makeup. Therefore, when I stumbled upon a trending makeup tutorial for the “ideal passport photo” on TikTok, I decided to give it a shot and see if it lives up to the buzz.
The trending video, created by TikTok user Georgia Barratt, included many more steps than my usual makeup routine. Not only did it take a considerable amount of time, but there were also a few techniques I needed to practice several times before I could master them. (I’m looking at you, winged eyeliner.) I followed Barratt’s exact instructions, using products on hand that closely matched those she applied in her video.
While the steps were somewhat tricky to follow, and at times it felt like the order of application lacked logic, the final outcome was truly rewarding. Keep scrolling for a detailed guide to achieving the perfect passport makeup look, and be sure to check out the results for yourself.
:upscale()/2022/09/29/943/n/1922153/tmp_kGEtfO_1f005d4fc13bb17d_JPEG_image-49278310AADB-1.jpeg)
Step One: Shape Your Eyebrows
To start off, I used an eyebrow gel to groom my eyebrows, giving them a full, lifted appearance. Any eyebrow gel will do as long as it provides sufficient hold to keep the hairs in place. Barratt’s tutorial showed her lifting the tail ends upwards while keeping the front sections squared, so I aimed to replicate her technique.
Step Two: Use a Hydrating Primer
Primers aren’t my favorite, but in Barratt’s method, she applied a hydrating primer next. I chose the E.l.f. Cosmetics Halo Glow ($14) since it gives me a luminous base without the tackiness often associated with primers.
:extract_cover():upscale():fill(ffffff)/2022/09/29/949/n/44344577/shopVsVjEt.jpg)
Step Three: Apply Foundation and Conceal Eyebrows
Next, I applied foundation with a small amount of product to cover my face as I usually do. For concealer, I used just a dab beneath my eyes. Additionally, I applied the Kulfi Main Match Concealer ($26) beneath my brows to carve them out and give them a well-defined shape. Barratt mentioned that defining her eyebrows ensured they appeared as symmetrical as possible, which is crucial since passport photos are taken straight on.
:extract_cover():upscale():fill(ffffff)/2022/09/29/954/n/1922153/ca89a61a633613eea81c23.28612413_s2609279-mai.webp)
Step Four: Over-the-Top Contouring
In her video, Barratt mentioned using “OTT” (over-the-top) contouring for this look, so I followed her lead and contoured the same areas of my face: above my temples, the highest points of my cheeks, my nose, chin, and jawline. At one point, she described sucking in her cheeks to guide the contour line, and I did the same. I used the Milk Makeup Bionic Liquid Bronzer ($32), finishing with a touch of contour on the inner corners of my eyelids.
:extract_cover():upscale():fill(ffffff)/2022/09/29/953/n/1922153/79fbdbf2633613d50c4938.92644818_Bionic-bronz.webp)
:upscale()/2022/09/29/944/n/1922153/tmp_3v4IoX_cc1327d564c1dd61_JPEG_image-060BA7FE52BB-1.jpeg)
Step Five: Enhance with More Concealer
Barratt added a touch more concealer between her eyebrows and at the corners of her eyes, opting for a lighter concealer that was about three shades lighter than her complexion. Not having a corresponding shade, I went with the Lawless Conseal the Deal Concealer ($26) that was slightly lighter than my first concealer.
:extract_cover():upscale():fill(ffffff)/2022/09/29/953/n/1922153/2d0c4f0d633613af1f2dd1.22211527_Screen_Shot_.png)
Step Six: Apply Blush
Following Barratt’s steps, I placed three dots of liquid blush onto the high points of each cheekbone, then blended the color using a blush brush.
Step Seven: Define with Concealer
Even though Barratt had already used concealer, after applying blush, she added a bit more beneath her contoured areas on both cheeks. I mirrored this step using the lighter concealer.
Step Eight: Set with Powder
I took the Laura Mercier Translucent Powder ($47) and lightly tapped it across my face to set everything.
:extract_cover():upscale():fill(ffffff)/2022/09/29/954/n/1922153/95ef522863361407b01968.54033103_s870618-main.webp)
:upscale()/2022/09/29/945/n/1922153/tmp_1tU9g5_a2ed97d589ed8278_JPEG_image-0993B507F29E-1.jpeg)
Step Nine: Apply Bronzer
Next, I applied bronzer to all the areas I had previously contoured: my temples, cheeks, nose, chin, and jawline.
Step Ten: Dust on Additional Blush
Even though I already added a hint of liquid blush, at this stage Barratt applied powder blush to the elevated points of her cheeks and her eyelids, so I mimicked her approach.
Step Eleven: Bake
I placed a heavier layer of translucent powder under my eyes, beneath my cheekbones, and around my nose using a beauty sponge. I allowed the powder to set while finishing the remaining steps of the tutorial.
Step Twelve: Create Winged Eyeliner
As my powder settled, I started on my eyes. Barratt drew a subtle wing using a brown liquid liner in the corners of each eye, aiming for a simple yet pulled-together look. To intensify the effect, she also lined the inner corners of her eyes towards her nose. Since I have downturned eyes and haven’t quite mastered winged liner, I opted for a brown tint instead using the NYX Lift N’ Snatch Brow Tint Pen ($12) in brown. Surprisingly, it turned out quite well for me.